Thursday, October 30, 2014

Project Life Contest!


Win every item currently available in the Project Life by Stampin' Up! line!
FIRST PLACE PRIZE: ONE HUNDRED (100) first place winners will receive their choice of any single Project Life by Stampin' Up! card collection and coordinating accessory pack. (Approximate Retail Value of prize: $24.90 USD.)
GRAND PRIZE: ONE (1) grand prize winner will receive every item currently available in the Project Life by Stampin' Up! line! (Approximate Retail Value of prize: $475.00 USD. Subject to item availability on date the prize is awarded. See Official Rules for details.)

If you go to my Facebook page, there is a link to enter the Giveaway!

Good Luck and Happy Stamping!
Cyndy

Wednesday, October 29, 2014

Holiday Supplement

In case you didn't know, Stampin' Up! has rolled out a supplement for this holiday season. If you haven't seen it, let me know and I'll get one out to you. There is a kit to make the stars on the cover, SO ADORABLE! and so much more! Scroll down to view the items in the supplement or click on the image to shop directly. Perfect timing for the holidays!
Built for Free Using: My Stampin Blog

Happy Stamping!
Cyndy

Tuesday, October 28, 2014

Weekly Deals!

Built for Free Using: My Stampin Blog


Ah, what can I say about this week's deals! Button, button, who's got a button? They are such a great way to embellish a card, scrapbook page or whatever! Here is a project I did quite a while back and I used buttons along the bottom. You can never have too many buttons! Also the framelits and punches. Love these products. So many things you can do with them as well.
The dotted scallop border punch. You can use it just as is or trim it in half as well. Can also look like a piece of ribbon! If you need help with putting together what you need for a project, just give me a holler and I will help you figure it all out.
Happy Stamping!
Cyndy

Monday, October 27, 2014

Mojo Monday

So how does that title sound? Trying to come up with something for different days of the week. So I didn't get a chance to stamp over the weekend. It's time for firewood! And closing up the garden. So this card was done by a friend of mine, Louise. She gave it to me at our last gathering (Shoebox Swap) and thought how easy is that!
She used the tree punch from the Holiday Mini and then the fringe scissors. I will have to make a sample to give more ideas for this simple technique.

Happy Stamping!
Cyndy

Sunday, October 26, 2014

Technique Thursday

Happy Sunday!
I did not get a chance to post these pictures till now. I'm trying to work out a schedule but life just keeps getting in the way!
So for Thursday we just did one card and two 3D projects. I saw this card on Pinterest. It was done I think last year by Snippets & Pretties. I thought what a great card to give a family!
The way it opens is you pull the bottom top piece. This card used punches, framelits, & embossing folders. Yes there are a lot of pieces to this card but oh so cute! Don't you think? Please leave a comment and let me know. Now on to the next project! Much simpler!

Built for Free Using: My Stampin Blog


My friend Dale. She made this for me last year and thought how cute is that! It uses a die cut and four punches.
So for the head you would punch the center first and then offset the larger punch for that "halo" effect. I used the gold foil that got punched out as the backing of the front piece to sandwich the linen thread and "body" of the angel. The large rhinestone has since retired and so did the stamp set that was stamped on the "arms & body" of the angel, but you could use any lined image stamp for that and replace the rhinestone with something else.

Built for Free Using: My Stampin Blog


Our last project was for the fall. I found this on Pinterest also. It uses the Curvy Keepsake Box Thinlit Die. When I saw this in the Holiday Mini I thought it was cute and thought "Oh I don't need that!" I had gotten the box maker, which is great but the things you can do with this die! Oh, it's to die for! Ha ha! Well anyway this die can be used year round, so if you don't have it, you've got to get it!
Isn't that the most adorable pumpkin! you don't have to worry about it making a mess on your table or anything! And can you believe it was even easier then the angel? Yes, it was! So for this pumpkin you have to die cut two pieces of the die cut, assemble, sponge on the ink and stamp the "lines" and the close box, the face was made with three punches. I stuck them on with the two-way glue! That's it! Amazing isn't it? This was made with vellum card stock so if you wanted you could use one of those LED tea lights and then it will give you a nice glow in the evening.

Built for Free Using: My Stampin Blog


If you've enjoyed these projects, please leave a comment and if you need any of these products, just click on the item and you can order it and have it shipped directly to your home!

Happy Stamping!
Cyndy

Wednesday, October 22, 2014

Shoebox Swap Updated!

Ok, a day late but here are some more from our Shoebox Swap. I went to take pictures of the rest of the swaps and realized my phone was full and now I need to remove pictures so I can take some more photos. The dilemma is what photos to remove! Oh well, give me a few days to figure that one out. In the meantime here are some of the swaps.
This first one was designed by Louise. Nice and simple. Love the colors. What a great embossing folder. Embossing folders are such an inexpensive way to give so much to a card. Love it! What more can I say.

This next card was designed by Kathryn. Another simply card. Love it! We used the Blendabilities to color in the glass and highlight bright. I have the embossing folder and glad to see it used with a different stamp set then the Cheerful Christmas set.

This card was designed by Pauline. I first made a card using this technique at a shoebox box at convention. This really is easy. You take a rectangle piece of card stock and fold it in half and then bring each edge into the fold, ending with three folds. You're making something like a screen people used to use way back when. The bottom is using a punch, in this case the Decorative Label and the top we used the new Confetti Stars punch. Also used was the Holiday Home bundle. What a lovely card!

This was an extra that I had brought the sample. I've seen this on several websites. It's using the new Curvy Keepsakes Box thin lit. It's been on backorder and mine had just come in. I've only had time to use it a couple of times and thought everyone would enjoy this one. We used vellum card stock and sponged on the color and for the lines, was a piece from Work of Art stamp set. A couple of punches for the eyes and mouth and done! You can use those LED tea lights for inside. Now how stink in cute is that!

There are more swaps to follow, but as I mentioned I need to take some pictures off my phone so I can get the rest on there and onto this blog! So enjoy for now!

Happy Stampin!
Cyndy

Monday, October 20, 2014

Shoebox Swap

Well Saturday we had a our Shoebox swap. It was a small group but lots of ideas were flowing! Everyone had great samples and now I'm all set for the coming holiday with card ideas. If you don't know what a shoebox swap is, it's making a sample and you cut and prepare everything for each participant to make the sample. It's a great way to learn a new technique or idea. Here are the tags that I did.
 This one I copied right out of the catalog! I did change it up just a bit. I used some linen thread and the clay. With the clay I took a tiny piece and made a ball, flattened it and stamped the bird in cherry cobbler. In the catalog they used a button, which I did have but liked the white with red. Since the stamp set is photopolymer, it's much easier to stamp through the punch, although some did have a bit of difficulty. On the back has a to/from so you can use it as a gift tag and then later or instead of an ornament! Hope you like it!
This tag I found on Pinterest, sorry I don't remember the name, but they weren't SU. It used other product and I thought this could easily be a SU tag! Again on the back has the to/from. I punched six 1 1/4" circles from the DSP stack in the holiday mini. Sorry I don't remember the names, and folded them in half and burnished with a bone folder. You then attach the folded circles to each other but two. You don't want to make a full circle because those two get attached to the tag, which was made with the scallop tag topper. There are also holes along the right side of the circles to add some interest. To do that I used the piercing template and piercing pad and paper piercer, you know that pointy thing!

Ok, I just realized I haven't taken pictures of the other swaps, so that will have to wait until tomorrow. Have to keep you coming back for more!

Please post a comment and tell me what you think.

Happy Stamping!
Cyndy

Wednesday, October 15, 2014

Weekly Deals


Yes, I'm a little late posting, but it does show up under the tab for weekly deals each week, so I'm not always in a rush to publish it. But there are several items this week that you might be interested in. The Truly Grateful stamp set is perfect for this time of year. Also the decorative window box is a great box to put some treats in for any time of year. I could go on about each item, but here just let me show you all of them! To make any purchase, just click on the "shop now" button at the top.
Happy Stamping!
Cyndy

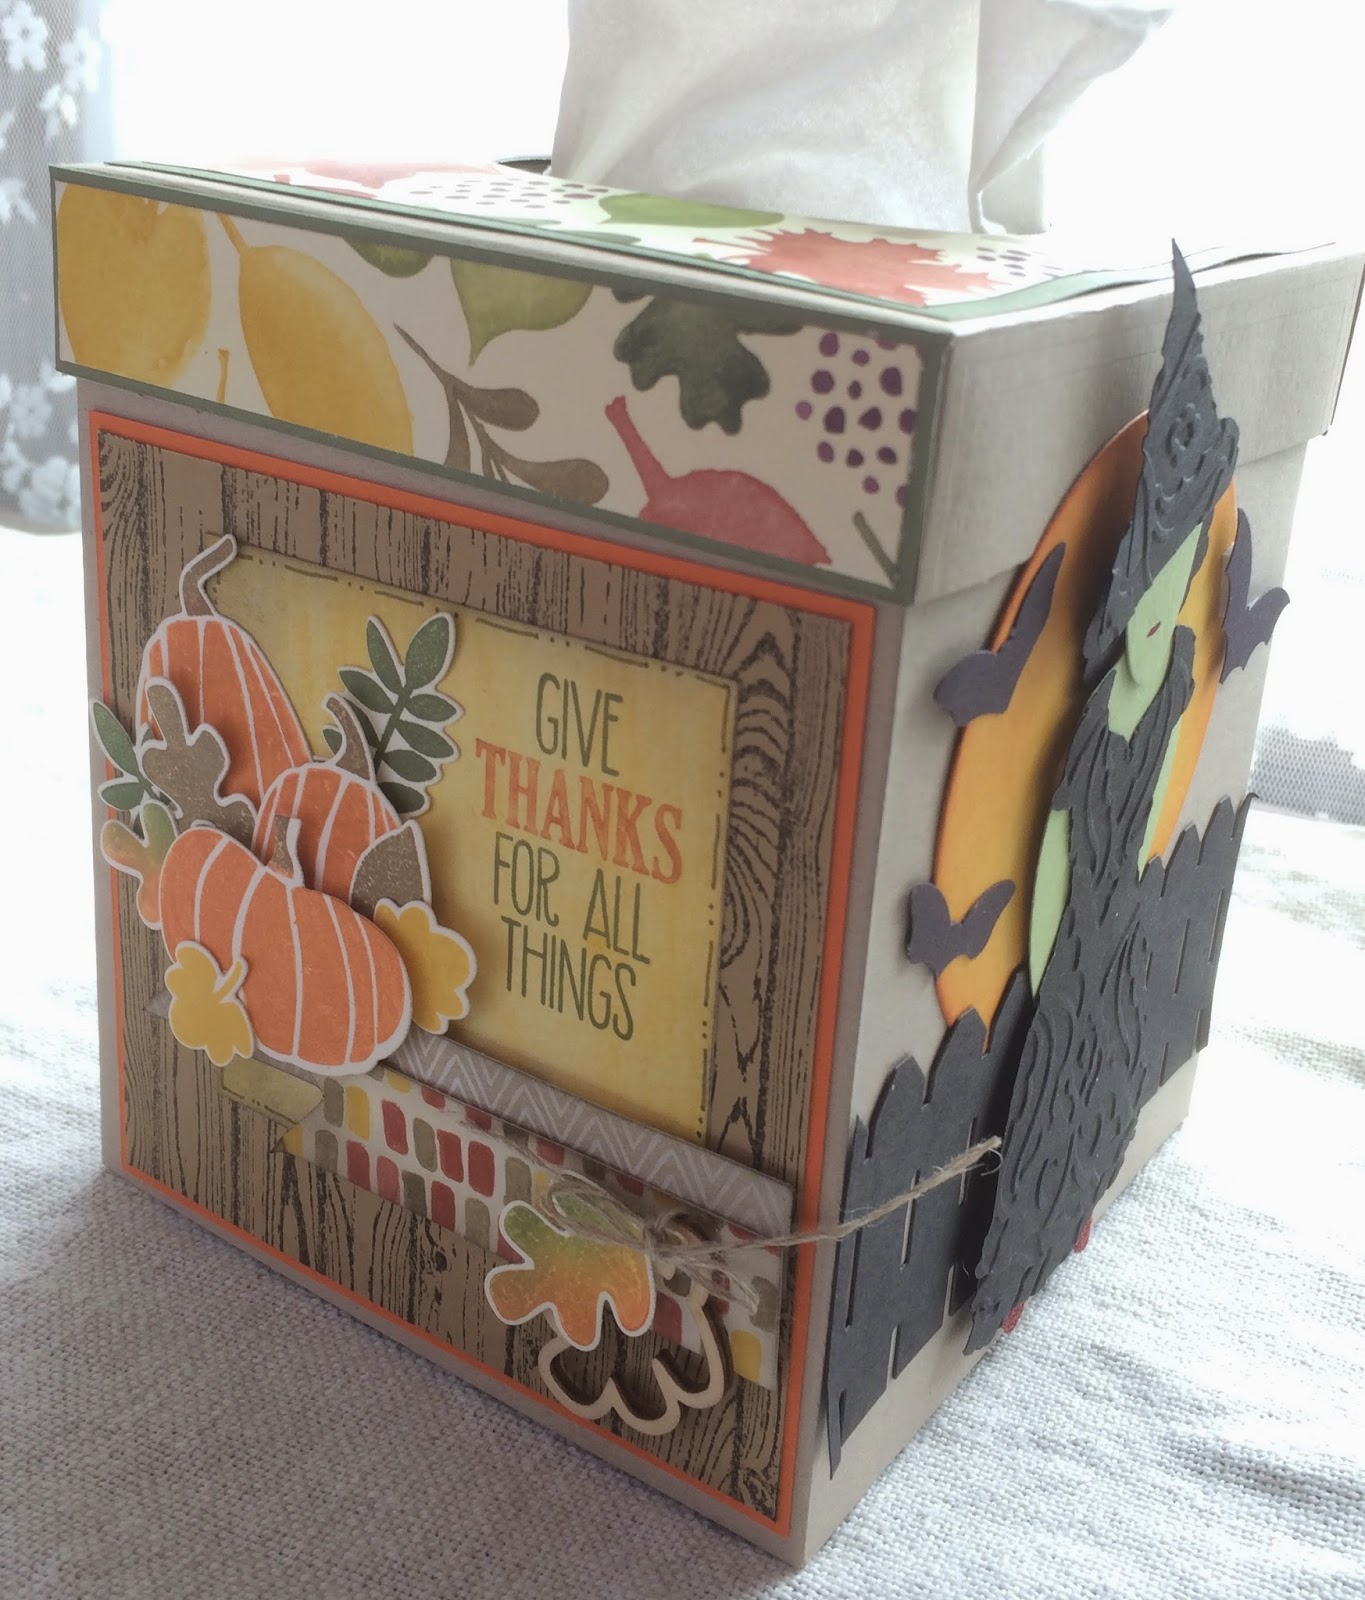
Tissue Box

Well as promised, here are the other two sides of the tissue box we did this past weekend. We had a lot of fun and they learned several new techniques.
 I loved making all the sides for this box and wanted it to be good for not just Halloween, but for the entire fall season. This ghost I think took the most amount of time. The background was the masking technique. I started with a piece of Whisper White card stock and die cut one of the smaller circles. I then sponged on Daffodil Delight, then added Elegant Eggplant, and ended with Night of Navy. After I took off the mask I gently rubbed over the moon with the Elegant Eggplant. The stars are from the new star border punch and adhered with the two way glue. The bat is the larger butterfly punch and 1/2" circle punch. The "tomb stones" are made from the Modern Label punch. The grass is cut with the fringe scissors. I did sponge it before I cut it and then crinkled it to add more texture. I also added some leaves from the new fall frame lit, which is the same one that has the ghost.
This side was pretty simple. I used the woodgrain stamp and Early Espresso ink and stamped on Soft Suede card stock. The wreath I used the baby wipe technique. I used the same inks as the DSP. The phrase inside is from the new Hostess set you can earn for FREE! It's called Good Greetings. It's a great set that is so versatile. The promotion ends on the 31st. You do need to host a workshop with sales of $300 (before shipping and tax).

Well I hope you enjoyed this box. I've already made, a very simple, box for the Christmas season. If you need any of the measurements or directions, please contact me.

Happy Stamping!
Cyndy

Tuesday, October 7, 2014

Weekly Deals & Stamp A Stack

Here is my INK swap from convention I made using the Apothecary Accents Framelits. This is such a versatile die. I also used the mosaic embossing folder which the punch that is also part of the weekly deals would coordinate very nicely with the folder.

Are you in need of holiday cards? Well I can solve that problem! I can do a Stamp A Stack in your home! How convenient is that! Get a group of your friends together for an evening out or during the day and I'll do the rest! You will make 12 cards in total, three each of four designs with envelopes. All for only $25.00! I'll have everything cut and ready to go. Everybody loves getting a handmade card. So why not make some great easy fun cards for those special in your life!

Happy Stamping!
Cyndy
Monday, October 6, 2014

Pumpkins, Pumpkins! Where are the pumpkins?

They are here! My husband likes to plant pumpkins, tomatoes, and watermelons each year. He has a couple of small gardens and likes to get as much as possible planted. His tomatoes were late this year, but boy are they coming in now! The watermelon didn't fare as well. We think the horses or deer kept eating whatever was growing outside the fence line. These vines would take over everything! But the pumpkins did great! He did have a few jumbo pumpkins going but only one survived. We do have many small pumpkins which are great for making pumpkin pie and bread.

Over the weekend my son and his girlfriend picked the pumpkins and gathered them up. Here is a picture of all the pumpkins. Surprisingly his girlfriend had never gone pumpkin picking as a kid so this was a real treat for her.


Then they carved one of the pumpkins. What a great job!

Here are some gourds I plants along with more tomatoes! The grape size tomatoes, I think there is at least 2 lbs in that basket!

Happy Stamping!
Cyndy


Sunday, October 5, 2014

Happy World Card Making Day!

Yes, I'm a bit late posting today. I've been working still, on typing up instructions for my projects for next weekend. I got the easy ones out of the way and now for typing up the directions for the tissue box. The box itself is very easy, it's how you decorate it, and as you can see from the two sides (from the previous post) each side is a bit involved. I will be making a couple more, less involved ones and will post when they are complete. But as for now, let's stick to a card.

I actually did this card at Fall Fest, but thought it was a cute card for today. Simple and easy. Are you a washi tape horder? I love the stuff but don't seem to use it much. Here is an easy way to use it.
Just take strips of washi tape and adhere it to your card stock. Lining up the edges gives it a smooth surface to stamp on and then stamp your image! It's that easy! Make sure your ink is darker then the washi tape you're using. I've also used washi tape to secure photos or anything else you want to secure. Using it as a piece of ribbon or embellishment on a card or scrapbook page. I'm working on another way to use it that I saw on another blog but it isn't working for me so for now, that will wait. Enjoy this sample and this beautiful fall weather we are having!

Happy Stamping!
Cyndy

Thursday, October 2, 2014

Preparing for Octoberfest

If you haven't been to the Girl Scout Adult weekend, Octoberfest, you're missing a lot! It's a great time to get away, relax, hike, ride a horse, stamp, get a message, or just read. This is an adult only weekend and we have a great time. I've been doing this weekend for many years. I teach a stamp class that's usually geared toward home decor. This year we're going to do several projects. One is something I've been wanting to do for a long time. Several years ago I saw someone cover a tissue box. I thought this was great, you could make one for the different seasons or holidays. Here is a picture of the one I had started back then and like a bunch of things, never got to finish.
 I just did two different sides. I felt like I was killing myself by overthinking what it should look like. What was nice that the paper on the two sides had the bird printed on it. This paper coordinated with Nature's Walk (retired), along with the embossing folder that I used.
Here is the other side. I used more of the DSP with the stamp set. All is retired :( . I really liked this set. On this side I stamped the bird and the background.

Here is the box they're going to make next weekend. I did all sides different, so here you can see two of the sides. I had a lot of fun making this box cover. What's nice is you can just pop off one and replace it with another. I'm going to try and make some for the other seasons, to give them some ideas of other designs. This box has a lot to it. You can keep this as simple or more involved as you want. Check back in a couple of weeks to see the rest of the box and other samples.
Related Posts Plugin for WordPress, Blogger...