Friday, September 29, 2017

Last Group of Holiday Mini Swaps

This is the last group of the Holiday Mini Swap I participated in and will have more for you next month! Tomorrow is our annual Fall Fest and I signed up to be a part of another organized swap with the Holiday Mini. So if you'd like to see more and have even more ideas, stay tuned!

 This card was done by Leslie. She organized the swap. This is one of those cards that is easy to duplicate. She used a bundle called Merry Little Labels. Leslie stamped one of the images with Dapper Denim on Pool Party then punched it with the Everyday Label punch. That is layered on a piece of Dapper Denim that was die cut with the Layering Square framelits. Yes you see a rectangle there. To achieve a rectangle, you don't cut the full square, you can do this a couple of different ways. So if you need help to do this, contact me and I can walk you through it. This was layered on a piece of Merry Little Christmas Designer Series Paper. Leslie then embossed a piece of Pool Party with the Sparkle Embossing Folder. Her card base is Dapper Denim. To finish it off, she used some rhinestones.


This next card, I don't know who to give credit. Unfortunately they didn't give their name. This is a set from the mini, I thought about getting but there is only so much you can afford! The stamp set is called Season Like Christmas. This is a three step stamp set. Which means it takes 3 stamps to make the tree. Two stamps actually make the tree and the third stamp adds the ornaments or lights. Depends on how you stamp it.  I think there is actually one more stamp for the trunk. She used Crumb Cake for the base and stamped the splotches with Soft Suede. The tree was stamped in Garden Green, one part must have been stamped off to get the two tones. To finish the tree off, she stamped the ornaments in VersaMark and used Gold Embossing Powder. This was all done on Whisper White and layered on Real Red. The sentiment was also embossed with the gold and die cut with the Layering Oval Framelits. That was layered on a piece of the Coffee Break Designer Series Paper. Isn't it great how you can use some pattern paper that isn't holidayish and works! To finish off this card, she used the 1/8" Gold Ribbon.

Mena made this next card. Here is another card easy to duplicate. She used Feeling of Christmas and stamped the wreath with Old Olive, Pool Party, and Cherry Cobbler. The bow on the wreath is from Pretty Pines Thinlits. This was all done on Whisper White and then layered on Cherry Cobbler. The sentiment is stamped in Old Olive on Whisper White and layered on Old Olive. Both of these pieces were punched with the Triple Banner punch. The card base is Pool Party and she used the Softly Falling Embossing Folder. This is another versatile embossing folder. Mena also used some rhinestones to finish off her card.

I saved my card for last again! I used the Carols of Christmas, which was something Stampin' Up! had as a pre order for customers. I really like this bundle. I've made many samples using it. On this card I only used the deer from the framelits. I die cut here in the Gold Foil paper. The two main images are the phrases. I stamped the phrase in VersaMark and used Gold Embossing Powder on Basic Black card stock. I think it really pops! I did die cut this with the Stitched Framelits. This is another product I use A LOT! The holly is Always Artichoke. To get a decent circle, I die cut a post it so it would stick a bit to the card stock and give me a template so I'd know where to stamp the holly. Since I was making several of these, I got better as I went along! I think this is another card easy to duplicate. My card base and layers are Crumb Cake and Basic Black. The trim you see is the Jute Twine in the Holiday Mini. This trim would be great to use to wrap your holiday packages.

Well that's it for now and I'll have new swaps next week to start sharing along with pictures from our Fall Fest. I'll be demonstrating our new Embossing Paste and the projects we made. Have a great weekend and thanks for stopping by! I look forward to your comments.

If you don't have a demonstrator, I'd love to be yours! Contact me know if you have any questions for need help with anything. All these products can be found in my STORE. When shopping, don't forget to use this month's VIP Host Code.


Wednesday, September 27, 2017

Last group of monthly swaps

I can't believe September is almost over! This month has really flown by! In just a few days we will be having our Fall Fest event and I may be getting more swaps! (From my monthly group and another organized Holiday Mini Swap).

So just to refresh if you haven't seen my other posts, I'm part of a group of usually ten women that swap every month. Each month the theme of the swap changes. Whoever is the host gets to determine the theme. For August the theme was a color combo. The colors were Crumb Cake, Dapper Denim, and Peekaboo Peach.


This first card was done a new member of our group, Laura. The sentiment on the card front was computer generated. She used some Designer Series paper from Pick a Pattern which uses the colors from the combo. Besides the combo, she also used Emerald Envy and Firty Flamingo. Laura die cut from the Swirly Scribbles in Peekaboo Peach and added some Burlap Ribbon and a Glitter Enamel Dot.

Carol did this next card and would be great sending to your friends and family that live at or near the beach! This is from Beachy Little Christmas. She used markers to color in the ornaments and used the banner from the Large Numbers Framelits. This is a great quick and simple card.

This last card I did. I saw something similar but using different colors. I'm not sure what papers they used but I stamped on Shimmery White. First I spritzed the card stock with water and then stamped the images so they would bleed and give a bit of a water color effect. If it wasn't bleeding enough I would spritz it a bit more. I used Oh So Eclectic. I really like this set. Unfortunately I haven't used it too much yet, but look out! The sentiment is from Label me Pretty. Both of these sets are bundles and new in the annual catalog. Oh So Eclectic coordinates with a framelit and the Label me Pretty has a coordinating punch. I used the combo color inks and card stock. (Crumb Cake, Dapper Denim, & Peekaboo Peach). I did add Whisper White as well. I stamped the sentiment and punched it with the 1 1/4" circle punch and then another circle in Peekaboo Peach with the 1 3/8" circle punch and then layered all that on the Pretty Label punch then popped it up on dimensionals. The Peekaboo Peach 5/8" Crinkle Seam Binding Ribbon goes great with this card as well. Before I added all my layers I did use the Dapper Denim marker and flicked it with the cap to give it a spray look.

I hope you enjoyed all these swaps. September swaps will hopefully be next week and the theme is fall/halloween. Thanks for stopping by and I look forward to seeing your comments. If you don't have a demonstrator, I'd love to be yours! If you need help or have any questions, please let me know. You can contact me HERE. When purchasing any of the products used you can find them in my STORE. Don't forget to use this month's VIP Host Code.


Monday, September 25, 2017

Last Product of the Month

I hope you've been enjoying this month's Product of the Month. Today is the last post for the Spooky Cat Bundle. At least as the Product of the month! As I mentioned before, I think this set would be great for some other celebrations besides Halloween, especially the cat punch.

Here is a refresh of the bundle. The stamp set is photopolymer, which makes it easy to do the 2 step stamping. There are potions bottles and 3 different stamps to put all kinds of potions in! The "trick or treat" & "Happy Halloween" both fit in the "web" image, which also works very nicely with the new Everyday Label Punch. The buckle for the witches hat and a couple images for the owl as well.


This is the Designer Series Paper, Spooky Night. The sheet with the cats works great with the punch and the sheet with the pumpkins coordinates with the Patterned Pumpkins Thinlits. As you can see this paper can also work with fall themes, great for masculine cards and more! I used this paper on all my samples from last week.


This card shows another way to use the Designer Series Paper that isn't a Halloween card. The cats are punched from the paper, the sentiment is from Thankful Thoughts and the lacy edge is the Decorative Ribbon Border, which I adhered to the Designer Series Paper. I embossed the Very Vanilla card stock partially with Oh My Stars embossing folder. You could easily make this a birthday card or anything else.


 While scanning Pinterest and watching TV I got this idea of making the cat into a lion. I saw something on Pinterest that sparked the idea and then saw a commercial on TV that had a dog with a lion's mane. I don't remember what they were selling, but thought I bet I could do that to the cat. I stamped the sunflower from the Painted Harvest with Crushed Curry and Cajon Craze, punched out the center first with the 1 1/4" Circle punch then punched it again with the Starburst punch. The cat is punched out with Crushed Curry and stamped the face from the Spooky Cat set and then put on his "mane". My lion is on a Basic Black die cut circle from the Layering Circles and used a piece of paper from Pick a Pattern Designer Series Paper. The sentiment is from A Little Wild and embellished it with the new mini gold sequin trim. I used a dimensional to pop it up.


This next card I cased from someone who use a mono chromatic look of black and white. I've always wanted a calico cat, so thought this was the next best thing! The squares are Crushed Curry and Basic Black and die cut with the Stitched Framelits and Layering Square Framelits. I then punched them together. I think next time I would do one at a time. It was a bit hard to punch both at the same time. The washi tape is from the Year of Cheer Suite and thought it had that "calico" look. I also used the a couple of pieces from the Pick a Pattern washi tape, then added a Black Baker's twine bow. I can't remember the set the "hello" is from but I did stamp that in black. I really like how this card came out.


I hope you've enjoyed all the samples for this Product of the month. As you can see, you can get a lot more from this bundle then just Halloween! Let me know if there are items you'd like to see samples of or themes, techniques or other ideas. I'd love to hear what you have to say!

Thanks for stopping by. If you don't have a demonstrator I'd love to be yours! You can find all the products I've used in my STORE. Don't forget to use this month's VIP Host Code. For questions, or help contact me.


Friday, September 22, 2017

More Holiday Mini Swap

A little late getting this one out! It's been a busy last few days! I've got one more group of swaps from  the Holiday Mini after this post.  Next Saturday will be Fall Fest and I'm participating in another Holiday Mini swap so I'll have some in October!

For this first swap Lilly used the Winter Wonder Embossing Folder and so did several others. It's a great embossing to use for winter cards. She also used the Snowflake Sentiments Bundle, which includes the Swirly Snowflake Thinlits. The stamp set has several Holiday sentiments for the outside and inside of your cards. The sentiment was stamped with Dapper Denim and so is the card base. The big snowflake was embossed with Whisper White and the small snowflake was die cut with the Silver Foil paper. Lilly embellished the card with some Rhinestones and the Mini Tinsel trim from the Holiday Mini.

 Marlene also used the Winter Wonder Embossing Folder and embossed the Silver Foil paper, which is layered on Whisper White and then Cherry Cobbler for the base. The sentiment is form Watercolor Christmas, which is stamped with Cherry Cobbler ink on Whisper White card stock and die cut with the Stitched Framelits and then layered on Cherry Cobbler and die cut with the Layering Oval Framelits and popped it up with Dimensionals.

 For this card Pat also used the Winter Wonder and the Softly Falling Embossing Folders. She added Dazzling Diamonds to the snowflake and fussy cut it. The sentiment is from Half Full in Fresh Fig. I forgot to take a picture of the inside. Pat stamped more images from the set and colored them in with the aqua painter, including the wine glasses from the set. This was all done, tone on tone of Whisper White. Cute card.

This last card was done by Vicki. Again she used the same embossing folder, Winter Wonder. You can see how popular this folder is! The other stamp set that is part of the suite with Snowflake Sentiments is Cheers to the Year, which is the greeting and the snowflake on this card. Vicki heat embossed the snowflake with Gold Embossing Powder and used a strip of paper from Cheers to the Year Designer Series. I love this paper, so elegant and versatile.  Not only does this paper work for the holidays, but great for weddings, anniversaries, christenings, baptisms, or any celebrations you want to glitz up. This is the paper to do it with. This paper is a speciality pack. It has foil in of Gold, Silver, Copper, and Champagne. It's really stunning. It's only one sided and you get 3 sheets of 4 different patterns.

I hope you enjoyed these cards and have given you some inspiration to create some of your own! Thanks for stopping by and hope you have a fabulous weekend! Here in the northwest corner of NJ the weather is suppose to be close to summer, even though fall has just started!

Please post comments, I'd love to read them and if you have any questions, or need help with something, you can contact me HERE.

If you don't have a demonstrator, I'd love to be yours! To purchase any of these items, you can find them in my STORE. When shopping, make sure to use this month's VIP Host Code.


Wednesday, September 20, 2017

More of August Monthly Swaps

Here is the next group of my monthly swap. If you'd like to see last week, you can find it HERE. In case you don't know what I'm talking about, I participate in a monthly swap with a group of about 10 very talented demonstrators. The theme changes each month and whoever hosts that month has picked what the theme will be. For August, Gayle was the host and she did a color combo of Dapper Denim, Peekaboo Peach, and Crumb Cake.

This first card was done by Mena. She used Flower Shop and Dragonfly Dreams stamp sets. The flowers were stamped in Peekaboo Peach and the sentiment was done in Dapper Denim. Mena used Whisper White along with Dapper Denim and Crumb Cake. The butterfly was a die cut from the Butterfly Thinlits. There is another butterfly die called Bold Butterfly Framelits and coordinates nicely with the one Mena used. The center of the butterfly has one of those Clear Faceted Gems.

 This next card was done by our host Gayle. She used Special Celebrations stamp set and stamped the sentiment in Dapper Denium. The rest of the card was the Layered Leaves Embossing Folder and several dies. The sentiment was die cut with the Stitched Framelits and Layered Ovals and the 1/8" handheld punch so she could put the Peekaboo Peach Crinkled Ribbon through and added some Rhinestones. All the leaves were die cut with the Bouquet Bunch Framelits.

Jen made this next card. Such a simple but beautiful card! She used the Lovely Friends Bundle. It's hard to see but she embossed the Dapper Denim layer with the Layered Leaves Embossing Folder. The flower and leaves in the lower left corner are from the bundle. She also used the Peekaboo Peach Crinkled Ribbon and put a sequin from the Iridescent Sequin pack.

I'll have the last bund of swaps next week for you. I hope you enjoyed these cards and have given you some inspiration to create your own! It's ok to CASE (Copy And Share Everything) your own! I'd love to see them. They can be exactly what you see or change them up a little or a lot to make it your own!

If you don't have a demonstrator, I'd love to be yours. I true appreciate ALL my customers! If you'd like to get any of these products you can find them in my STORE and don't forget to use this month's VIP Host Code!


Tuesday, September 19, 2017

Star Wars Birthday!

This past Sunday was my sons birthday and he is a big fan of Star Wars! So I decided to make him a Star Wars card. I've made him Star Wars before, but do you think I took a picture and posted it! I'll have to get it from him and post that too. Monday was my oldest nephew's birthday so I made him a Star Wars card as well. He to is a Star Wars fan, or at least I think so! Wanted to make his a bit special for two reasons. He is turning 21 and it's been just over a year since his father passed. I think last year we were all just so numb from his sudden passing. Anyway, let's get back to some happy moments! I've saved several Star Wars card on my Pinterest board. I also saw this fabulous box card another demonstrator had made on our Facebook group and I'm sure she spent a long time making it. She did a lot of drawing and cutting to make it. Now I'm not afraid of fussy cutting or anything like that, but I can't draw to save my life! That's part of why I love Stampin' Up! I can stamp and color great! They do all the drawing for me! My husband, daughter, and I think my son can all draw great!

So here is the card I made for my son. I did CASE this card. The original card did a salt technique background. I didn't have a lot of time to do that since I was pulling out some retired punches to make Yoda and the light saber. The Designer Series paper that I used is retired and from one of our Holiday minis. It's actually Christmas or winter paper, but I thought it looked perfect for what I wanted to do. I did stamp the phrase on the front with Labeler Alphabet stamp set (current set!). To make the light saber glowing part is a piece of vellum and colored it. It was a lot of fun to make and really like how well Yoda turned out. I did use several circle punches for the eyes, which I believe are all current. If you have any questions on how I did any of it, contact me, I'd be more then happy to share!
 Here is the inside of the card. The person I CASED the above card had a link to download a free font. So the phrase inside was printed using that Star Wars font. I did stamp the "Happy Birthday". The Millennium Falcon was CASED from Tami White. She had a great video on how to make it. I did use some retired dies and embossing folder to make it but could probably use our current circle framelits.
This last card is for my nephew. I also CASED this from Tami White. I used the star border punch (retired) a little different then how Tami did it so I didn't get as much overlap. I made the light saber like the one I did on the above card instead. I just liked that look a little better. You can change out the Death Star for the Millennium Falcom instead. Watching Tami's video I found out she's a big Star Wars fan. I'll have to let her know about my cards next time I see her!

I hope you enjoyed these cards. It's always fun to make some more challenging cards once in a while!

I wish I could say you can buy all these items in my STORE but you can't. If there is anything you do want to buy don't forget to use this month's VIP Host Code!


Monday, September 18, 2017

Another Week of Product of the Month!!!

I hope you've been enjoying the ideas for this month's Product of the Month. In you've just seen this for the first time, here's a recap.  Each month I pick a product from one of our current catalogs and feature it each Monday. You can find this month's Product, the Spooky Cat Bundle on page 52-53 in the Holiday Mini. This bundle is part of a suite that has coordinating Designer Series Paper, trim, and treat tubes. If you'd like to view the other posts for this month's Product of the Month, you can find them HERE and HERE.
So here again is the bundle, and as you can see the Clear Tiny Treat Boxes from the annual catalog would make a great treat holder for this time of year!

 Here is another item, the Test Tubes that are also great to use! This is a super simple project to make. Stampin' Up! put this together.

No cat in this treat holder but is using the stamp set and paper from the suite. To get that shape, they used the Everyday Label Punch from the Holiday Mini and used about a 1" strip of cardstock. Stamp your sentiment or whatever your're stamping then slide it into the punch and center it, it only punches the center of the punch.
Here is a visual to help. Where the arrows are, is the center area of the punch. I don't know about you, but I'm a VERY visual person. As they say, A Picture is Worth a Thousand Words! So true!


Here is another use for the Test Tubes. I did case this from another demonstrator, sorry I don't remember from who, but have seen this from several others as well. To make this, you'll need a piece of card stock that is 4" x 7 7/8". You'll score it on the long side at 3", 3 5/8", and 4 1/4". Turn and now you'll make two cut lines to join the score lines.


Put you're card stock at 1 5/8" and cut from one score line to the last score line. Move your card stock over to 2 3/8" and repeat. You'll fold the card stock in a mountain, valley, mountain fashion and pop the cut section out.


The layers are 2 3/4" x 3 3/4" and 2 1/2" x 3 1/2". I used Pumpkin Pie and a piece of the paper from the suite. The two pieces for the sentiment are Smokey Slate and Pumpkin Pie. I stamped the Smokey Slate and then punched it out with the Everyday Label punch and the "Trick or Treat" is a 1" strip. I also stamped the witches hat on a piece of Very Vanilla and fussy cut it. For the inside I used Very Vanilla (2 3/4" x 3 3/4") and stamped the hat again and "Happy Halloween" also from the stamp set.

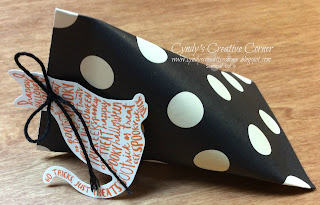
 This is an oldie but "goodie". It's called a sour cream container. Super simple to make, especially if you're making many! You need a rectangle piece of card stock or Designer Series Paper and Tear and Tape or other strong adhesive. I used a piece of 3" x 4". You put your adhesive on 2 longs sides and one short (on the wrong side or back side of paper). First make it a tube, attaching the two short ends. Then with that seam you just created, use that as your starting point on the end and squeeze the one end together. Put your contents in and then with the seam in the center, squeeze the other end. I used a 1/8" handheld punch and a piece of black baker's twine to attach the cat that I stamped in Pumpkin Pie on a piece of Very Vanilla and punched out with the cat punch.

This last treat was made with the Mini Treat Bag Framelit. I used the Spooky Nights Designer Series Paper here also. The old is stamped onto a piece of the Spooky Nights Designer Series Paper. I also used the Layering Squares Framelits to cut out the paper and layered it with a piece of Basic Black. There is also a belly band around it in Basic Black.

I hope you liked these treats and have given you some ideas to hand out to some of your special trick or treaters! You can easily change all of these projects up for any occasion. I thought the sour cream container would make great place settings for those holiday gatherings. Change the cat out to a tag and stamp or write their names on the tag and use paper to suite the occasion!

You can find all these products in my STORE. Don't forget to use this month's VIP Host Code to get your FREE Gift! If you need any help making any of these projects, let me know. You can contact me HERE. Thanks for stopping by and look forward to seeing your projects and hearing your comments!


Related Posts Plugin for WordPress, Blogger...