Thursday, August 31, 2017

Product of the Month Last Week

Here's another post I thought published! 

So anyway. I've been working on samples for today and next week. I hope you enjoy them. Just to review what the product of the month is, it's the Carols of Christmas Bundle. It's in the new Holiday Mini Catalog and available to customers for purchase so they can get a jump start on their holiday cards! If you'd like to look at the other posts click HEREHERE, and HERE.

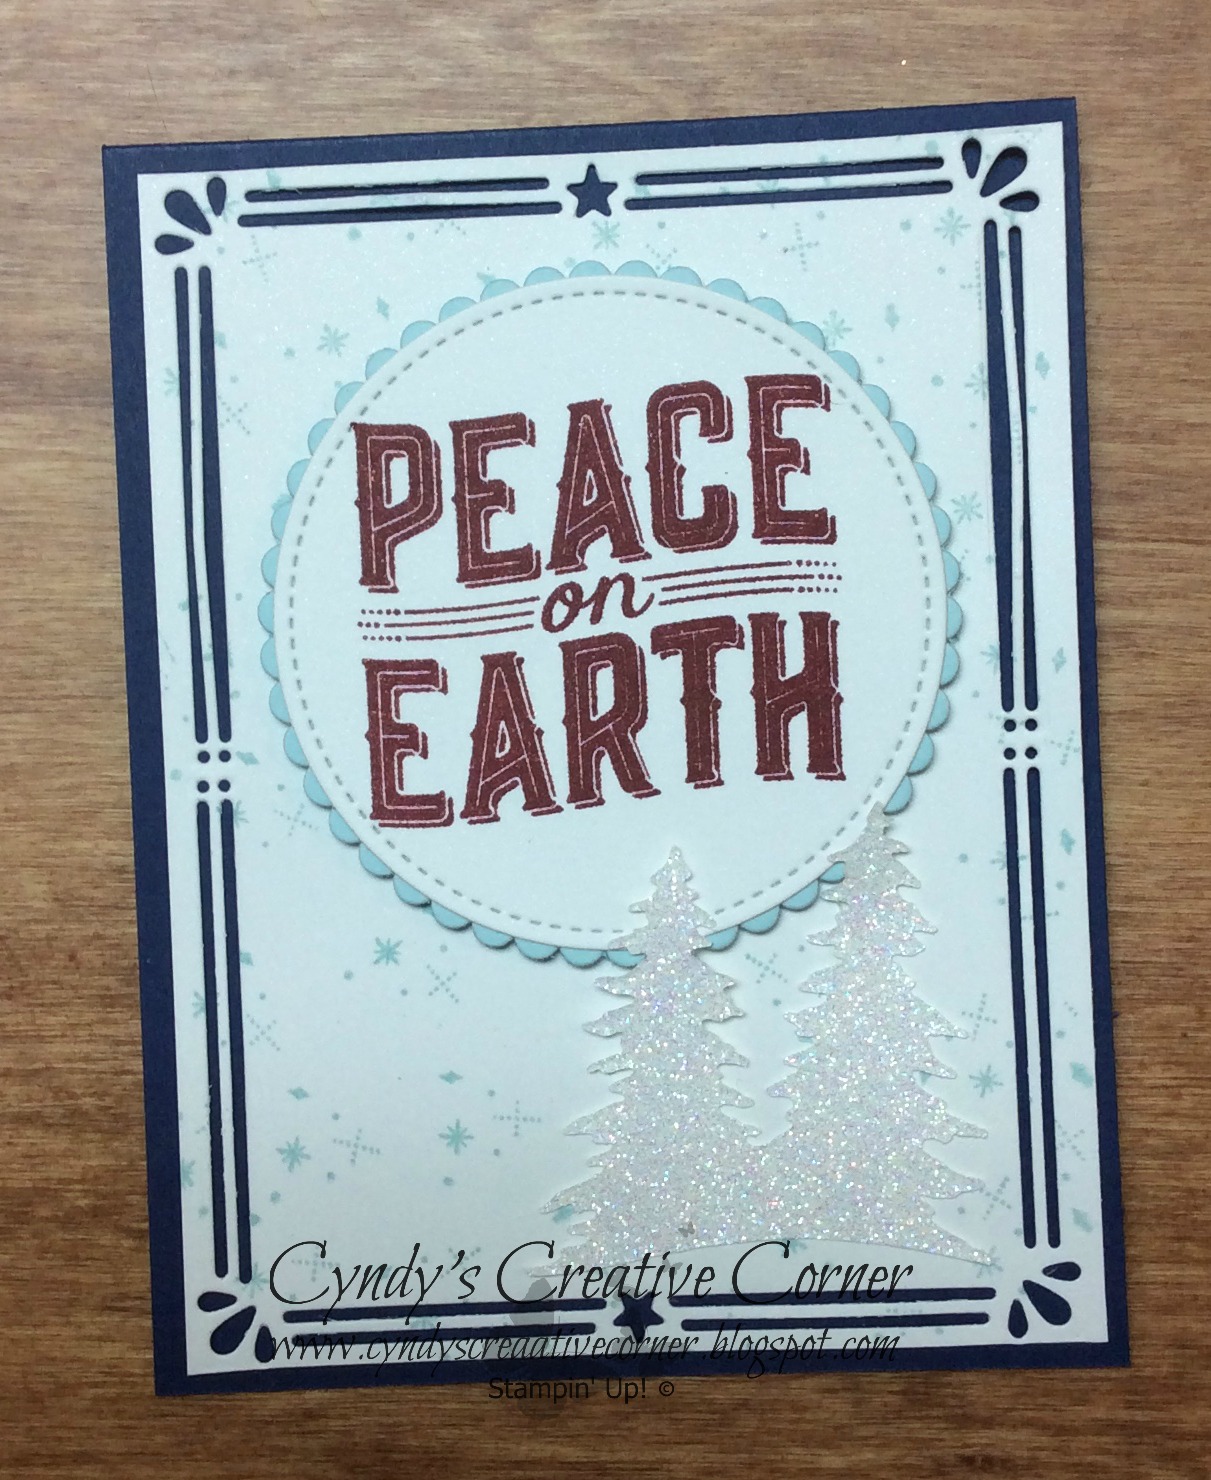
This first card I cased and love how it turned out! Inside the circle is a piece of Designer Series Paper from the Daisy pack! The border die is just used on the top. I also used the Layering Circle and Stitched framelits for the opening and the snowy hills. The trees in the front were die cut using the Thick Whisper White card stock and then water colored them slightly with Pool Party. The other tree and card base I used the new Tranquil Tide cardstock, along with the ink for the flowers and "Peace". I used Crumb Cake for the deer.
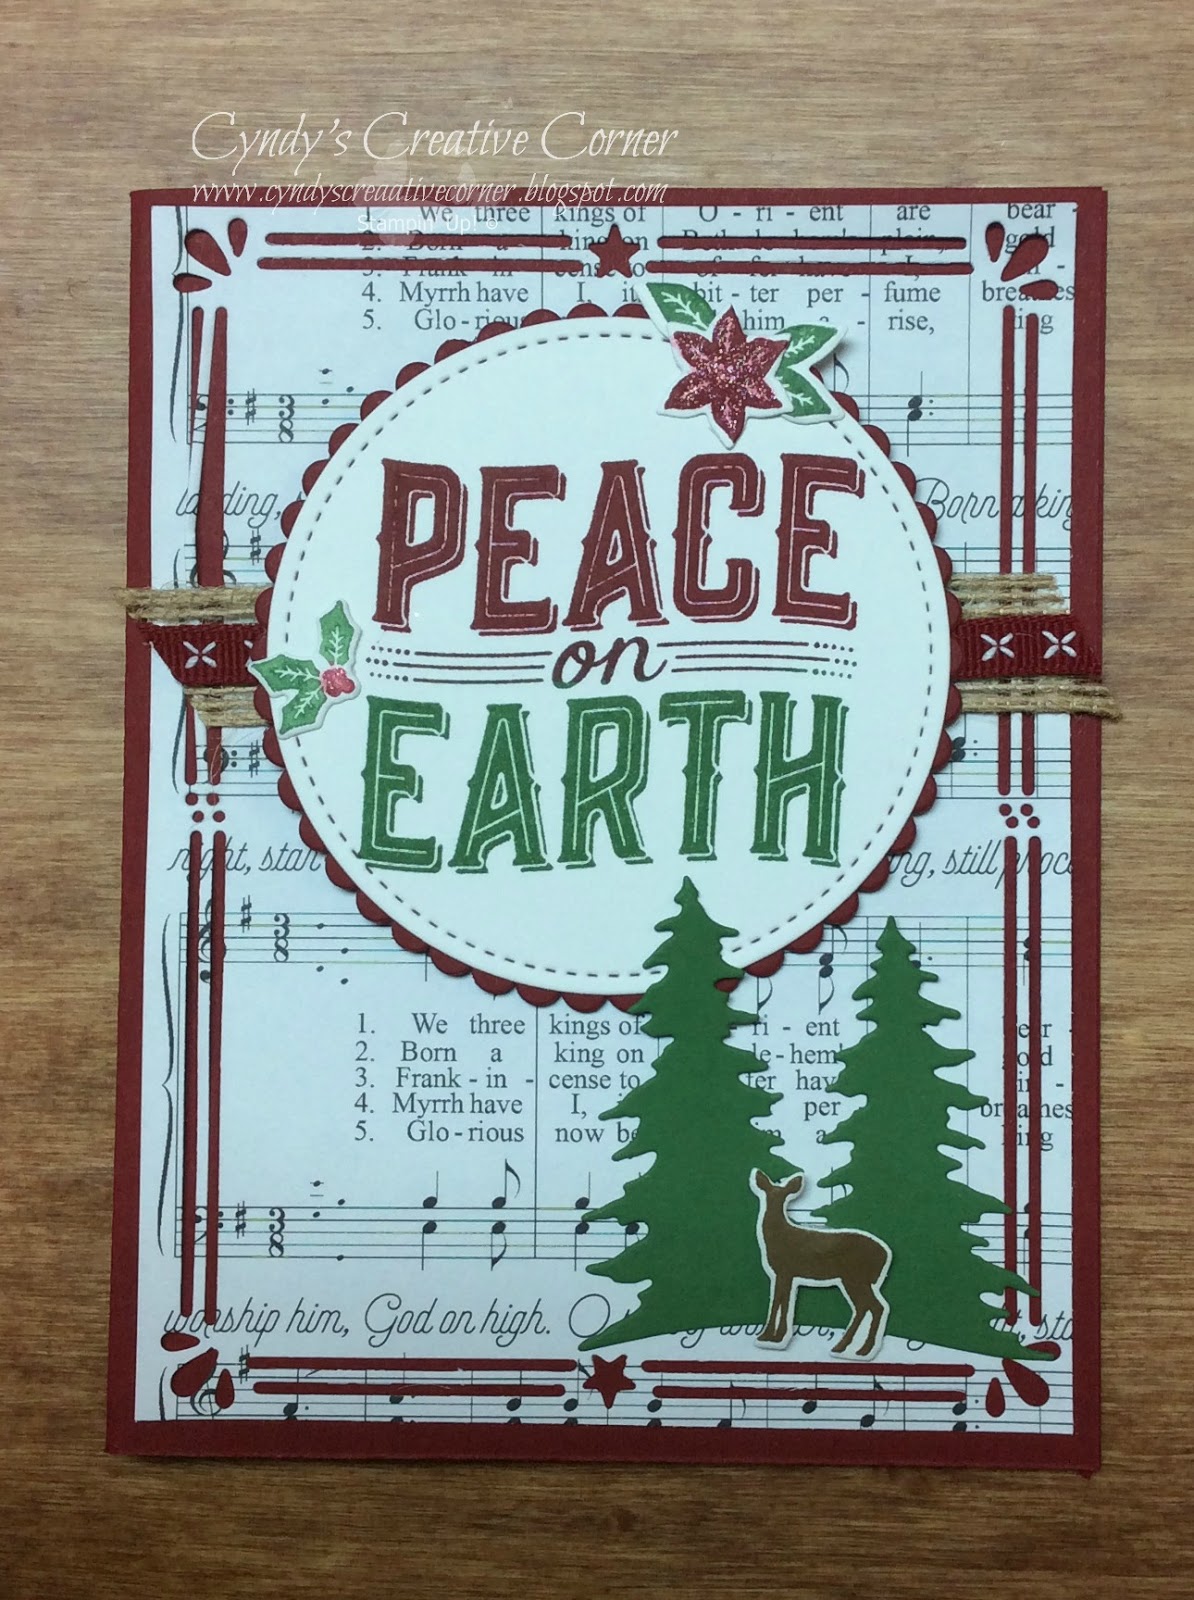
This second card, I used the Merry Music Designer Series Paper. The card base is Cherry Cobbler as well as the scallop circle layer. I also used Cherry Cobbler ink for half of the "Peace on Earth" and the flower. When I inked the "Peace on Earth", I first inked the Garden Green on the bottom half and then inked the Cherry Cobbler for the "Peace". The inks overlapped in the middle. I used the Stitched framelits here again to die cut this piece after stamping it. I also layered the burlap ribbon with the 1/4" Double Stitched ribbon.  This did have a lot of die cutting but think it was so worth it! This will go to someone special!

I hope you enjoyed these last cards for the Product of the Month. I will be posting more in the coming months because this is such a great bundle, but wanted to give you some ideas on different uses for this bundle. I thank you for stopping by and would love to hear from you! If you don't have a demonstrator in the US, I'd love to have you and be your Creative Coach! To purchase any of these items, you can go to my store HERE.


Wednesday, August 30, 2017

Vacation Special for August

Well I'm just seeing I didn't publish this Post!!! LOL! I guess I'm really on vacation! This special is until September 6, so don't worry! If you placed an order from August 22 until September 6, you're still in! The special is, for ANY orders placed, you'll receive a sampling of Year of Cheer Embellishments! How great is that! When your order reaches $50 you'll also receive my monthly card kit along with a PDF on how to assemble. Make sure you use this month's VIP Host Code 3DSR7NFJ. To get this month's VIP Host Special you'll need to place a $60 order.
These are just a few thank you's for shopping with me. I appreciate all of your support!

Final Group 4 of Monthly Swap

Here's the last group of swaps from July. With all these, you'll have plenty ideas to get your cards started for the holidays. If you'd like me to do the cards for you, I have a class already planned out, just contact me to set a date!

So for this first card Mena used pieces of the Be Merry Designer Series Paper for her background and the sentiment is from Christmas Pines and used Cherry Cobbler ink then die cut it with the Stitched Shapes framelits. The pieces of DSP were layered on Whisper White and the base card is Garden Green. This a great card to replicate easily.
This next card was done by Lilly. Again it's amazing how different these cards look and the same Designer Series paper was used! Now I know Mena and Lilly live near each other. I wonder if they were stamping together when they both came up with their cards! Lilly used just strips of the Be Merry. What a great way to use up your scraps! The sentiment is from Teeny Tiny Wishes and is stamped in Garden Green and punched out with Classic Label punch. The strips of DSP were layered on Whisper White, then Cherry Cobbler, then onto the base of Whisper White. She also added 1/8" Silver ribbon.

A couple of very simple cards to make for your holiday cards. If you don't have the stamp set, you can certainly use whatever sentiment you do have on hand and you can change both of these cards into any occasion by just using different papers, stamps, and inks!

Thanks for stopping by and I'd love to hear from you and see what you're working on!

To purchase any of the items used, click HERE.


Friday, August 25, 2017

Camp Gift

I was going to post this last week, but wanted to make sure this wasn't seen by the recipient. In case you don't know, I'm a Girl Scout and have been for most of my life! The Girl Scouts has done so much for me and have enjoyed traveling with them. I guess I wasn't your typical Girl Scout. I didn't go to summer camp. I went to camp at different times of the year. There was just too many bugs during the summer! Then it turned out when we (husband & kids) moved to the northwest part of New Jersey I wasn't that far from my childhood camp! Yay! I now go there for an annual Octoberfest for adults and I teach all kinds of stamping home decor. I love it and have a great time! As with stamping when we have gatherings it's so nice to see our old friends and make new ones, so is with Girl Scouts. Well anyway, the woman who runs the camp (Camp Director) has been doing so for 30 years! Some of the old timers had a surprise luncheon for her and I offered to make a few things for her to give as a gift from everyone.
So here is the card I made. I didn't do this in the "A4" size. Not sure what size they call this but it's a sheet of card stock (8.5 x 11) folded in half. I wanted it bigger so everyone attending could sign it. I used Number of Years and the coordinating framelit call Large Numbers. The image behind the "30" is the punch Best Badge. If you don't recognize the other stamps, that's because the are retired. I purchased these my first year as a demonstrator and retired that year. I love these and don't think I'll ever get rid of them! I think they're called Girl Power and Camp Out. The Girl Power was made to imitate the Girl Scouts. They also had one that imitated the Boy Scouts.

So initially I was just going to make the card and thought why not make this piece of home decor! It's basically a scrapbook page on a clipboard. I bought some paper that had the Girl Scout theme and thought that would be perfect for this! Everything I used here was retired! As you can see I still have them because they were favorites of mine and worked great! There are no pictures because I was sending this to the coordinator of the luncheon and she was to put the pictures in. My thought was to put  now and then pictures. In case you don't know what that "thing" is next to the lined card, it's a friendship knot. When you're a counselor at camp they give out a strip of fabric and you have a "friend" tie the knot for you! A very nice tradition!

So I was having so much fun making everything and as I was scanning the internet for some inspiration I came across this saying "I'm _________ what's your super power? and thought this would be perfect for a "badge" so I had to make one! I had made a sleeping bag button (out of shrinky dinks we used to sell) and it wasn't working for the clipboard and thought it would fit perfect on the badge! Then, still having so much fun, I thought I'd make a backpack! I've been wanting to make one of those for years! I love the way this turned out! I made another button to match the rope hearts that I stamped all over as a faux closure. This also gave me another idea to have a class using the Gift Bag Punch Board! So stayed tuned for that! It'll probably be next year at this rate, but you never know!

I hope you liked these gifts. I really had such a great time creating them! It was great to be able to just create!

If you didn't get my weekly newsletter, I'm running a special while I'm on vacation. The special is to just place ANY order and I'll send you a sampling of the Year of Cheer Embellishments. Now if your order reaches $50, not only do you earn a Butterfly, you'll also receive this month's card kit with a PDF and when your order reaches $60, you'll get all that I mentioned but you'll also receive the 1/4" Copper Trim! To receive all these things, you need to use HOST CODE 3DSR7NFJ to make it easy for you, you can Click HERE to Shop! My little way of saying Thank You for your support! I always appreciate it!

Thank you so much for stopping by! Have a great weekend!

Wednesday, August 23, 2017

Group 3 of Monthly Swaps


Here are the next group of swaps. Hope this gives you some ideas to do for your own cards!
This first card was made by Gayle. She used a bundle that was available in last year's Holiday Mini and carried over into the new annual catalog. I really liked this bundle but unfortunately didn't get it. I've seen so many great Christmas cards along with other none seasonal cards as well. So this stamp set is Star of Light and the coordinating dies. She used
Real Red card stock for the base and stamped the images on Whisper White. This was layered on Dazzling Diamonds Glimmer paper. She used Smoky Slate & Real Red ink and added a rhinestone to the snowflake.
This next card was made by Debbie, she also used the Star of Light.  Amazing how different cards can be just by changing the colors. Here Debbie used Fresh Fig, Tranquil Tide, ink and card stock.  She also used rhinestones as an embellishment and added the gold faceted gems as well.
This card really wowed me! Carol made this card using At Home with You  & Christmas Pines. The images are stamped on watercolor paper and colored in with Real Red, Soft Sky, Garden Green, Crushed Curry, Crumb Cake using and aqua painter. This was then layered on Red Glimmer paper then put on the base of Garden Green. The sentiment was punched out using the Duet Banner Punch along with a piece of the Red Glimmer paper again.

Love this card! She really put a lot of work into this one!

I hope you're enjoying these swap cards, I know I have! Thanks for stopping by today and if you want to get any of these items, hop on over to my STORE!


Monday, August 21, 2017

Product of the Month late Post!

It's been a busy day and weekend! I feel like all I've been doing lately is play catch up! Today my husband and I celebrated our 35th wedding anniversary! Can you believe it? If I was 30, I'd say that's a long time! Well I'm not 30 but it's still a long time, but it just doesn't feel like it. That's partly why I'm so far behind. The other is we are taking more of a real vacation. That means not work the whole time we're down in VA!

So anyway. I've been working on samples for today and next week. I hope you enjoy them. Just to review what the product of the month is, it's the Carols of Christmas Bundle. It's in the new Holiday Mini Catalog and available to customers for purchase so they can get a jump start on their holiday cards! If you'd like to look at the other posts click HERE, and HERE.


After I did all these cards, I realized 3 of them have pretty much the same layout! I guess I liked it!

This first card uses Chocolate Chip for the base and is a top fold. The next layer is Whisper White and I used the outline die cut to frame everything. The trees are cut from the Daisy Designer Series Paper. I had seen a few other people do this and thought it was a great idea! So since I was using that paper, I looked to see what colors were in that pack and it was Tranquil Tide, so I used that to stamp the sentiment and also layer it. The sentiment was die cut using the Stitched Framelits.


This next card look familar? Yup! I used the same outline framelit. The base for this card is Night of Navy. I stamped the snow image in Soft Sky and also the scallop layer is Soft Sky. Here I stamped the sentiment in Cherry Cobbler and used the Stitched framelits again. The trees are die cut from Dazzling Diamonds Glimmer paper. I really like the Stitched Framelits. If you're looking to build your die cuts, I would certainly recommend them. I use them on many projects.

Well it's late and I still have lots to do! I'll have more next week and will also have a vacation special again but won't be able to get that up and running until later in the week. So make sure you stop by and see what else is happening.

To purchase any of these products HERE is the link. Thanks for stopping by and please leave a comment!


Wednesday, August 16, 2017

Group 2 of July Swaps

For these next two cards, they tie very nicely in with this month's Product of the Month! So besides all the samples I'll be sharing with you, here are a couple more! I can't say enough how lucky I feel to be in this group of such talented women!
 This first card was made by Jen. I feel extra special to be in this group because Jen is one of the Artisan's for Stampin' Up! I'm not sure if I mentioned this before, but now you know! This is such a great card and so easy to reproduce! She started with Whisper White for the base and has a layer of Real Red. The floral image from Wood Words (another non traditional holiday image!) was stamped in Real Red ink. She then stamped from the Carols of Christmas, the "Peace on Earth" in Archival Black on Crumb Cake and die cut with the Stitched Edge framelits. Jen added the new 3/8" Mini Chevron ribbon in Old Olive and for some sparkle she added the Iridescent sequins! I love it! Thanks Jen.
For this next card, using the same stamp set, Carols of Christmas, Pat used Dapper Denim and Tranquil Tide. Pat also used the border framelit as I did in my initial post but then embossed the layer with the Softly Falling embossing folder. The "Peace on Earth" was inked with both blue and green inks and also die cut with the Stitched Framelits, but used one of the circles instead of the square. To break up and add some interest, she used a piece of the 3/8" Striped Grosgrain ribbon in Dapper Denim. I liked the way she die cut the trees, once in the Dazzling Diamonds Glimmer paper and then in the Tranquil Tide card stock to give it a shadow. Pat also stamped the deer in Chocolate Chip ink and then die cut it. It's so nice to have the dies so you don't have to fussy cut everything! Lastly she added touches of the Clear Wink of Stella to the phrase and the deer. Not sure if you can tell in the picture, but it's there! It gives it just a bit of shimmer! Love this too!
I hope you've enjoyed these next cards and it's giving you more inspiration on using this fabulous bundle! To purchase any of these products, you can find them in my STORE. While shopping, don't forget to to the Host Code in to earn FREE stuff from ME! I so appreciate you taking the time to stop by my blog. I look forward to reading your comments and sharing any of what you're making!


Monday, August 14, 2017

More Product of the Month!

I'm a little late today. I needed the weekend off and some down time so I played catch up today!

So here are some more things to make using the Carols of Christmas Bundle. Just as a refresher, here is the Bundle, you can get it in Wood Mount or Clear Mount.

My thought process to create is usually to hop on Pinterest and get some ideas. Sometimes I see a card I like and make that just change up the colors, sometimes I look for a color combo to use. For this card it's a little of both. I saw a card I had saved using buttons as the ornaments so I thought I'd go with that theme. Wasn't sure what colors I wanted to use so went looking for some color combos. I also wanted to keep it simple. I hope you like it. I used Old Olive and Real Red. On the red ornaments I popped them up and colored them with Clear Wink of Stella. I also did "Peace" in Wink of Stella too.


This next card I saw a card similar in white and blues with gold. They also used one of the edgelits on the top. Again I wanted to keep it simple so I used gold embossing powder on Basic Black card stock for the sentiment and used the Stitched Framelits to cut it out. I also die cut the deer in gold foil paper. I die cut a post it using the same circle for a guide to stamp the holly around in Always Artichoke on Crumb Cake card stock. I was going for an "earthy" look and thought the new Jute twine in the Holiday Mini worked great on this card. This was layered on Basic Black and then used Crumb Cake for the base.

Remember this bundle is available to customers this month! If you'd like to get this bundle or any of the other products used, you can shop my store HERE!

Thanks for stopping by. I hope this has sparked your creative juices and get you going on your holiday cards.


Friday, August 11, 2017

Paper Pumpkin Special!!!

Just a quick post today! I wanted to let you know about the latest special!

Stampin' Up! has a Paper Pumpkin Special that starts today! If you've been thinking about trying out Paper Pumpkin, this is a great time to get your first kit at 50% OFF! I love getting my kits every month and seeing what fun projects I have to make! After I make what the kit is intended for, I always try and make some alternative projects as well! An added benefit for getting the kit through me is we get together every month to do our kits and I'll show you some alternative ideas as well! The special runs through September 10. Click HERE to start your subscription today! Make sure to use promo code!

Wednesday, August 9, 2017

July Group Swaps!

I was the host for our monthly swap for July and the theme I picked was Christmas in July! I thought, craft stores and such are always doing specials for holiday things since so many people who like to make items for Christmas do get a jump on them early! So I figured this would help me as well get some ideas for doing my own cards and classes!
So this first card is mine. I kinda got the idea from the next card. Then I did a brief search on Pinterest, my go to place. I can't remember if I found something there or googled, but probably Pinterest.  I don't recall who I cased this from but some of the items they used are no longer available or I just didn't have them. Can you believe that! Well anyway, I did a base of Whisper White and a layer of Smokey Slate. I heat embossed the phrase in Copper Embossing powder from the Christmas Pines stamp set. That round thing in the back is from the Swirly Bird thinlits. I die cut that in the Copper Foil paper. The snowflakes are from seasonal Layers, the larger one is also in the Smokey Slate and the smaller one is in Dazzling Diamonds Glimmer paper. The other to things sticking out are from the Pretty Pines thinlits. I added a few rhinestones for added interest. I really like how this all came together. I hope you do too!


Here is where I got my idea from! I saw this and was going to do a different card and thought what a great idea! So I put my thinking cap on and above is what I did. Vicki made this card and think it's just beautiful! She used a few items that are very non holidayish! Vicki started with a layer of Very Vanilla and used a piece from the Bundle of Love Specialty Designer Series Paper. On one side they are all gold the other side is either Blushing Bride or Soft Sky. She die cut one of the medallions from the Eastern Medallions thinlits in gold foil, used the 1/8" gold ribbon to hang the ornament and tied a bow out of the new 3/8" Metallic-Edge ribbon, also in gold. She stamped the phrase and snowflakes in Garden Green from the Christmas Pines. I think what a great way to use some non-traditional products!

I hope you enjoyed these first two cards. I'll share the rest during the month. I can't thank all the women who participate in this swap each month! They are all just so talented! Next month we have a new member, I can't wait to see what she makes!

To purchase any of these products, you can find them in my STORE. While shopping, don't forget to to the Host Code in to earn FREE stuff from ME! I so appreciate you taking the time to stop by my blog. I look forward to reading your comments and sharing any of what you're making!

Monday, August 7, 2017

Product of the Month!

Ok, I thought I'd start something new! Not that I don't have enough on my plate! But thought each month I'd feature a product from the current catalog. Since Stampin' Up! has a special going on to preorder the Carols of Christmas Bundle, I thought I'd start with that. If you have a particular you'd like me to feature, contact me, and I'll do my best to feature in an up coming month!

So if you haven't seen what the bundle looks like, here it is:
You don't have to purchase the whole bundle, but why wouldn't you want to save the extra 10%! Also if you have any of those coupons from July, you can save even more!

Ok, ready for a couple of cards using this bundle? Here are a couple I did right away. I did case this card, but thought how nice and simple. I used Dapper Denim and Soft Sky cardstock for the layers and stamped the "Peace on Earth" on Whisper White with Dapper Denim ink and popped up with dimensionals. The trees are die cut out of the Dazzling Diamonds Glimmer paper and used white Baker's Twine. The deer is stuck on with a mini glue dot.


On this next sample I wanted to step it up a notch and instead of cutting the Soft Sky layer smaller I left it the card front size of 4 1/4" x 5 1/2" and die the around it using the border die. I think it adds just that little extra!

I hoped you enjoyed these samples and have inspired you to get your holiday cards started early this year! To get any of these items you can go to my STORE. Make sure you use this month's Host Code!

Thanks for stopping by and look forward to your comments!

Saturday, August 5, 2017

Time to Redeem Your Coupons!

I'm a bit late getting my posts up this week. I'm recovering from a bad case of poison something! It doesn't look like the poison ivy I've had before so the doctors and I think it could be sumac or oak! That's what I get for not cleaning up properly after weeding! LOL! 

Those coupons you earned in July, it's time to redeem! Here is what the screens will look like so you'll know where to put them. Of course if you need help, just let me know! You can contact me HERE!

Also don't forget check out this month's VIP Host Code! New month, a new product you can earn for FREE! Plus with any order I'll send you this month's PDF and when your order reaches $50 (before shipping & tax), not only will you earn that butterfly toward FREE product I'll also send you this month's card kit! I haven't designed it just yet, I've been under the weather scratching!


So pull out that Wish List or how about get the Carols of Christmas Bundle and save even more! I love this bundle! There are so many samples I've seen using it! Plus I've used this bundle for two of the cards in my Holiday Stamp a Stack. Get this bundle and you'll be set for getting a jump start on your cards this year! I'll be scheduling

I'm a bit late getting my posts up this week. I'm recovering from a bad case of poison something! It doesn't look like the poison ivy I've had before so the doctors and I think it could be sumac or oak! That's what I get for not cleaning up properly after weeding! LOL! 

Those coupons you earned in July, it's time to redeem! Here is what the screens will look like so you'll know where to put them. Of course if you need help, just let me know! You can contact me HERE!

Also don't forget check out this month's VIP Host Code! New month, a new product you can earn for FREE! Plus with any order I'll send you this month's PDF and when your order reaches $50 (before shipping & tax), not only will you earn that butterfly toward FREE product I'll also send you this month's card kit! I haven't designed it just yet, I've been under the weather scratching!


So pull out that Wish List or how about getting the Carols of Christmas Bundle and save even more! I love this bundle! There are so many gorgeous samples I've seen using it! Plus I've used this bundle for two of the cards in my Holiday Stamp a Stack. Get this bundle and you'll be set for getting a jump start on your cards this year! I'll be re-scheduling this class again since my timeline isn't working out the way I had planned! So if you'd like to do these cards, let me know what dates work for you and we can schedule it in!

Thanks again for stopping by!


Related Posts Plugin for WordPress, Blogger...