Monday, October 9, 2017

More Fall Fest Holiday Swap

Last week was a very long post. I promise this week won't be nearly as long! I'll be posting each Monday in October my swaps from our annual Fall Fest event. If you'd like to see that post, you can find it HERE. The group of swaps I have for you today are different but shows the same technique. It's called Eclipse. I did this recently in my monthly Technique Class.

This first card was done by my very good friend Dale. She choose the Painted Harvest set. As you can see, just by changing out the colors on the sunflower, it gives it a whole new look! I LOVE these colors! They're my favorite (generally speaking). Her card base is Rich Razzleberry and so is the darker of the purples. The other is Sweet Sugarplum. The center of the flower is Crumb Cake and Sweet Sugarplum. She did the leaves in Old Olive and Pear Pizzazz. The "Happy Birthday" is from Birthday Blossoms and stamped with Memento Black. Everything was stamped on Whisper White then layered on Basic Black.

This next card was by Annette. I haven't seen Annette in a long time! She had foot surgery earlier this year, ouch! Annette used the Carols of Christmas, which I had for my first Product of the month! You can find more ideas HERE! The card base here is Cherry Cobbler and she stamped everything on Whisper White. Her ink colors were Cherry Cobbler, Smoky Slate, & Garden Green.
This last card made by Barbara. She used Good Tidings. This is such a pretty stamp set. It's what we call a two step stamp set, just like Painted Harvest. Barbara told me to create the holly branch it took about 6 stamps & inks! It's absolutely beautiful! I really love these holiday colors. So to start off with, she used Whisper White for her base and for the stamp layer. She embossed Old Olive with the Holly Embossing Folder. The other layer of card stock is Cherry Cobbler. All the inks she used were: Cherry Cobbler, Rose Red, Old Olive, Pear Pizzazz, Early Espresso, Soft Suede. She has Basic Black, but I really don't see it.

Everyone used the Large Letter Framelits to die cut the letters. To pop up the letters you can use either our dimensionals or the the foam adhesive strips. I've done it with the dimensionals but I must say the strips do really give it a lot more dimension!

Thanks for stopping by. I'd love to hear your comments! If you need help with anything, please contact me. I'm going to try and start listing all the supplies for ALL the cards, so scroll down and you'll find everything below. If you don't have a demonstrator, I'd love to be yours! I have great benefits to shop with me HERE & HERE! Just click on any item and it'll take you to my STORE. Don't forget to check back next week for more swaps!


Friday, October 6, 2017

Feature Friday - Product of the Month

Breast Cancer Awareness Month!

Welcome to my Feature Friday/Product of the Month! I was going to do a different bundle but since October is known for Breast Cancer awareness month, I thought this was the perfect time to use the Ribbon of Courage stamp set and it's coordinating framelit called Support Ribbon. This is a bundle, so if you purchase it as a bundle you can save 10%! It come in wood or clear mount and was also inspired by Patty Bennett who was a Million Dollar Sales Achiever. She wanted this in honor of her mother. I don't remember the whole story, so I won't try and ruin it! Also since, my mother had breast cancer and I too am a breast cancer survivor, just another reason to do this bundle this month!

So as a survivor, I want to STRONGLY recommend that you get an annual mammogram! If you haven't done one in awhile, please do! Your live may depend on it!

Here is a picture of the bundle and shown in pink! Perfect for this month! What I think is great about this bundle is you can use it for ANY cancer or other ribbon to support a particular cause. Plus you could use it for someone who just isn't feeling good. The sentiments in this set are just fantastic!

This first card is something is made a while ago to show off the Garden Trellis Embossing Folder. Here is shows both sides of the folder which I think look great! I also used the new Glitter Enamel Dots and the 1/2" Finely Woven Ribbon in Fresh Fig. I punched the word courage with the Duet Banner Punch. It's a pretty straight forward card.
This next project was made by another friend and demonstrator Pat. She recently did a Pink Crop and did this for a class and made a set for me! Isn't she so sweet!

She used the Fresh Florals Designer Series Paper to make the "envelope" to hold 2 note cards and their envelopes (they are part of the World Card Making Day sale).  The ribbon is the same that I used in the card above 1/2" Finely Woven Ribbon in Pink Powder and used it to tie it closed. I've made this holder a while ago and can't remember off the top of my head how it's done, but you use a 12"x12" sheet of paper.
Here it shows the inside of the holder and you can see how nicely the cards & envelopes fit inside. Besides the Powder Pink, she used Berry Burst ink (another new In Color).
In this photo, you can see the cards a bit better. She used a few other things on these cards but kept it pretty clean and simple. One sentiment is punched with a circle punch and the other with the new Pretty Label. There's also some White Baker's Twine and 3/8" Shimmer Ribbon in Powder Pink used as well. The only other thing that always adds a nice touch are the Rhinestone Jewels.

If you'd like to do this as a class or learn how, contact me and we can put something together.

Thanks for stopping by. If you don't have a demonstrator, I'd love to be yours! You can find all these items in my store HERE or by using the links above on the products as I mentioned them. When shopping, don't forget to use this month's VIP Host Code to get your FREE PDF for this month's card and when you spend $50 or more you'll also get the card kit absolutely FREE!


Wednesday, October 4, 2017

September Monthly Swaps

New month, new swaps, new theme! For September the theme was fall/Halloween. Almost half were Halloween, but could easily be changed to fall, a birthday, or something else. If this is your first time visiting my blog, I'm part of a group of about 10 Stampin' Up! Demonstrators and we take turns being the host of our monthly swap. When it's your month, you get to choose the theme of the swap.

This first card was done by Jen. She used Merry Cafe in the Holiday Mini and coordinates with Coffee Cup Framelits in the annual catalog. This stamp set several sentiments for fall, Christmas, the New Year, & more. I think you could use this year round and would be great for those who love coffee or tea. Jen also stamped the first layer of Fresh Fig with the Burlap background stamp in Archival Black, then layered the Merry Little Christmas Designer Series Paper. I love the use of the Black Vintage Crochet Trim just under the cup cap. She also used a few of the Black Rhinestones from the Holiday Mini as well.

This next card uses the Spooky Cat Bundle which I featured last month as my Product of the Month. The cat image is from the Spooky Night Designer Series Paper as is the striped background. I don't know why but I really like those chemistry beakers. The beakers themselves is one stamp and then there are 3 separate stamps to fill in the beakers. Pat also used the Stitched Shapes and Layering Circles Framelits and added a bit of Clear Wink of Stella to the beakers. This is a great card sketch. You can easily change out the elements for any theme!

This next card was done by Gayle. She shows the same cat as in the previous card as well as the orange cat. Both of these were punched with the Cat Punch out of the Spooky Night Designer Series Paper. The hat on the one cat is from another sheet of the paper as well as the background. Gayle also used a tiny bit of the Black Vintage Crochet Trim by the sentiment and tied a Black Baker's Twine around the one cat.

I hope you enjoyed this first group of swaps. I'll have have a few each Wednesday in October. If you don't have a demonstrator and would like to purchase any of these products, you can find them all in my STORE. Don't forget to use my VIP Host Code.

Thanks for stopping by and look forward to hearing from you.


Monday, October 2, 2017

Fall Fest and Swaps

Just to warn you, this is a long blog post! So bare with me! In case you're wondering why I'm not talking about my new product of the month, not to worry. I'm switching things around a bit and going to have my Product of the Month posts on Friday's. I think I'll call it "Feature Friday" (at least for now). I do have a new product already lined up and almost ready to go. I'm in the process of having to learn a new editing system so as long as it's not too complicated, I should be ok.

I'm not sure what I'll have each Monday, but this month I'll have my swaps from Fall Fest and my monthly swap will be on Wednesday's.


So Saturday was our annual Fall Fest gathering. Fall Fest is where a bunch of demonstrators get together to learn about new products, share ideas, talk business, and best of all get to see those we haven't seen in awhile. We had a great time and everyone loved the projects! Our fearless leader, Tina had me demonstrate how to use the new embossing paste in the annual catalog before all our make and take began. Surprisingly not many had purchased this product! It was one of the first things I got! My presentation went longer then I expected.

For the morning, they made a Mixed Media Canvas. Some were a bit intimidated by seeing the project, but once they got going, they really enjoyed it and glad they were able to try out the new embossing paste. I haven't planned this for a class yet, but if there's interest I'll schedule one.

This is a picture of the table I helped make their canvas! They loved it!


For the afternoon, they made a couple of winter themed cards. Here's a picture of those. Everyone also received one of the acetate boxes in the Holiday Mini. I showed them what they could do with the box. Such an easy way to decorate the box without doing much. I just used the Winter Wonder Embossing Folder for this.


The other afternoon project was a mini pizza box with 3 gift cards inside. I love these mini pizza boxes! They are adorable and in case you didn't know are food safe, so if you want to fill it with cookies or fudge, you're all set! These are also in the Holiday Mini. We used the Years to Cheer Suite on both projects. This Designer Series Paper is just gorgeous! It's a specialty paper. There are 4 designs and you get 3 sheets of each design. These cards all had some bling to them!


Now that you got to see what we made at Fall Fest, now you'll get to see some of the swaps from the organized swap I participated in! The rest of these swaps will be on each Monday in October. We all selected a stamp set from the Holiday Mini to use for this swap.

This first swap is by Pauline. This also showcases the Spooky Cat Bundle I did as Product of the Month in September. If you'd like to see some other ideas using that you can find those posts HERE, HERE, HERE, & HERE. I always love her creations. She does really beautiful work. She used the Spooky Night Designer Series paper along with the Spooky Cat & Labels to Love stamp sets. The Spooky Cat is bundled with a cat punch and the Labels to Love coordinates with the Everyday Label punch. All can be found in the Holiday Mini. Those cute little bats you see are from the Seasonal Tags Framelits.  She also filled in the owl eyes with the black rhinestones.


This next card was done by our fearless leader! She used Half Full. Love this card! Nice and clean and simple! I don't have this set but this is a great sketch you can use on ANY card! She also used 2 of my favorite colors! Card base is Whisper White, with a layer of Sahara Sand. She embossed the Old Olive with the thick Layered Leaves embossing folder. Tina also used the Scalloped Tag Topper punch to punch the Fresh Fig tag and the sentiment piece as well and put a piece of 1/8" Sheer Ribbon in Fresh Fig through the holes and topped it off with a Metal Rimmed Pearl.

This last card (for today) was done by Gina. Gina used Wonderful Life and the background set called Tree Rings. I have to get that background stamp! The Wonderful Life set also has words and images for Christmas and "Just Married" occasions.  She used Crumb Cake for her base, then stamped the Tree Rings on Very Vanilla with Crumb Cake ink & added strip of Daffodil Delight to divide the two sections. The car & other images are also stamped on Very Vanilla with Crumb Cake ink and colored in with Old Olive, Tangerine Tango, & Daffodil Delight. This was die cut with the Stitched Framelits and Layering Oval framelits. The leaves were punched with the Leaf Punch.

I hope you enjoyed these swaps and samples from Fall Fest. Thank you soooo much for reading through this VERY LONG post! I appreciate it! You can find all these products in my STORE. Make sure to use this month's VIP Host Code, when shopping. If you have any questions, or need help with anything, please let contact me. Thanks for stopping by!


Friday, September 29, 2017

Last Group of Holiday Mini Swaps

This is the last group of the Holiday Mini Swap I participated in and will have more for you next month! Tomorrow is our annual Fall Fest and I signed up to be a part of another organized swap with the Holiday Mini. So if you'd like to see more and have even more ideas, stay tuned!

 This card was done by Leslie. She organized the swap. This is one of those cards that is easy to duplicate. She used a bundle called Merry Little Labels. Leslie stamped one of the images with Dapper Denim on Pool Party then punched it with the Everyday Label punch. That is layered on a piece of Dapper Denim that was die cut with the Layering Square framelits. Yes you see a rectangle there. To achieve a rectangle, you don't cut the full square, you can do this a couple of different ways. So if you need help to do this, contact me and I can walk you through it. This was layered on a piece of Merry Little Christmas Designer Series Paper. Leslie then embossed a piece of Pool Party with the Sparkle Embossing Folder. Her card base is Dapper Denim. To finish it off, she used some rhinestones.


This next card, I don't know who to give credit. Unfortunately they didn't give their name. This is a set from the mini, I thought about getting but there is only so much you can afford! The stamp set is called Season Like Christmas. This is a three step stamp set. Which means it takes 3 stamps to make the tree. Two stamps actually make the tree and the third stamp adds the ornaments or lights. Depends on how you stamp it.  I think there is actually one more stamp for the trunk. She used Crumb Cake for the base and stamped the splotches with Soft Suede. The tree was stamped in Garden Green, one part must have been stamped off to get the two tones. To finish the tree off, she stamped the ornaments in VersaMark and used Gold Embossing Powder. This was all done on Whisper White and layered on Real Red. The sentiment was also embossed with the gold and die cut with the Layering Oval Framelits. That was layered on a piece of the Coffee Break Designer Series Paper. Isn't it great how you can use some pattern paper that isn't holidayish and works! To finish off this card, she used the 1/8" Gold Ribbon.

Mena made this next card. Here is another card easy to duplicate. She used Feeling of Christmas and stamped the wreath with Old Olive, Pool Party, and Cherry Cobbler. The bow on the wreath is from Pretty Pines Thinlits. This was all done on Whisper White and then layered on Cherry Cobbler. The sentiment is stamped in Old Olive on Whisper White and layered on Old Olive. Both of these pieces were punched with the Triple Banner punch. The card base is Pool Party and she used the Softly Falling Embossing Folder. This is another versatile embossing folder. Mena also used some rhinestones to finish off her card.

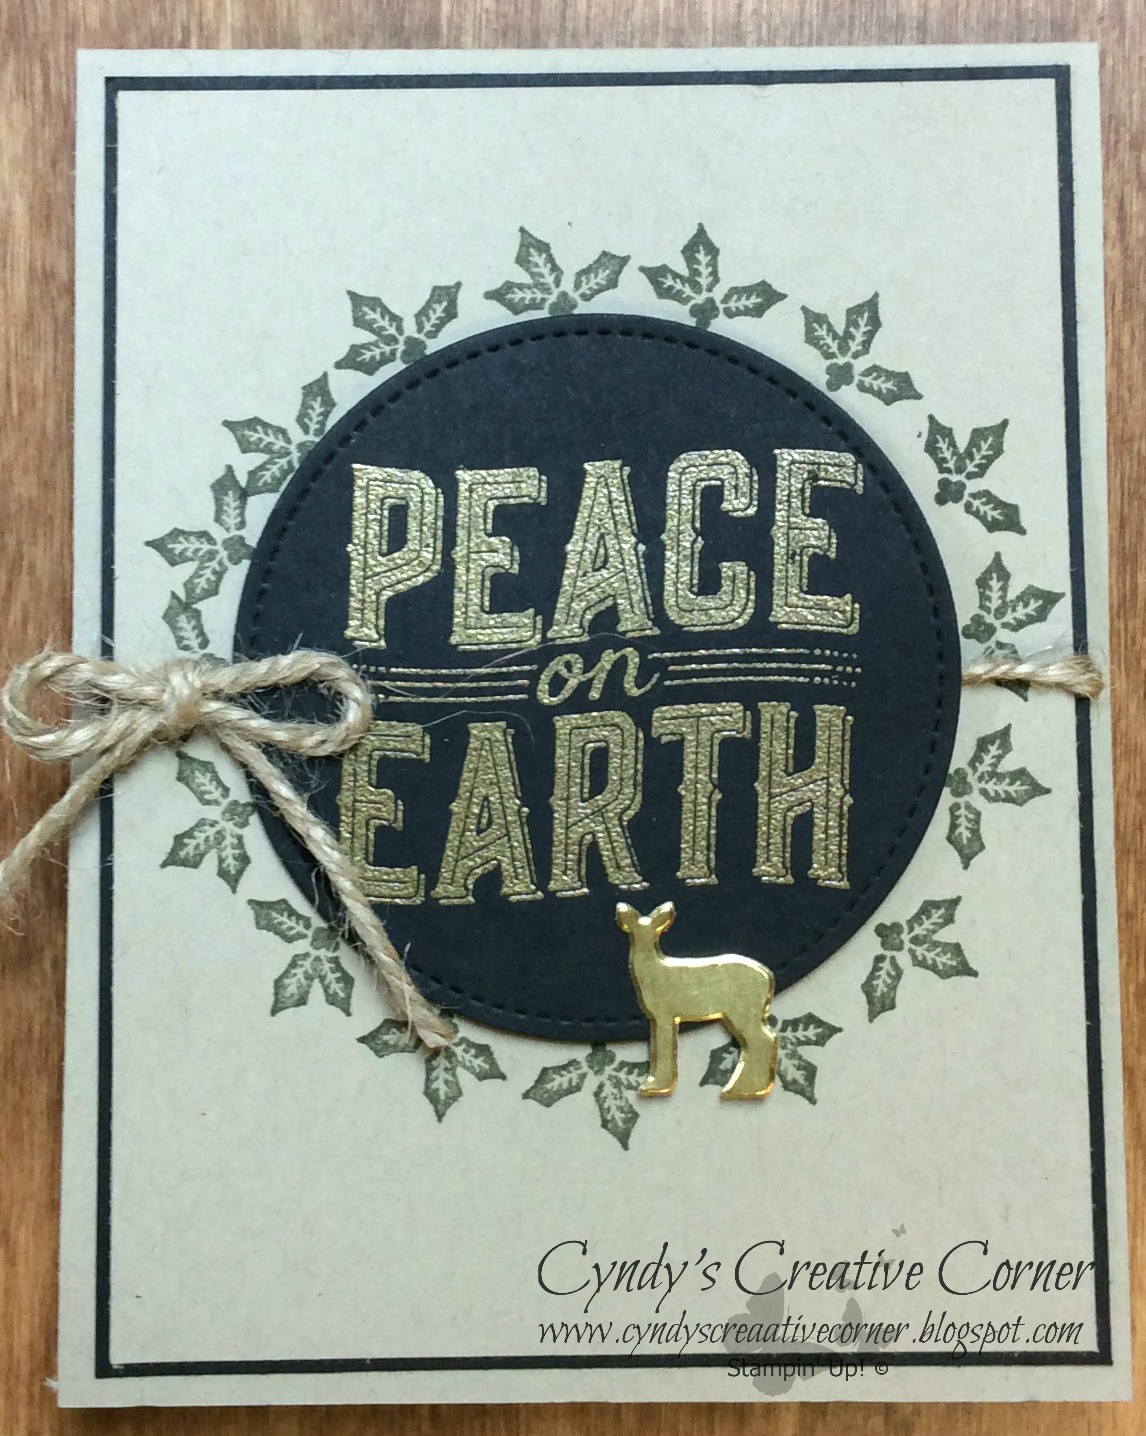
I saved my card for last again! I used the Carols of Christmas, which was something Stampin' Up! had as a pre order for customers. I really like this bundle. I've made many samples using it. On this card I only used the deer from the framelits. I die cut here in the Gold Foil paper. The two main images are the phrases. I stamped the phrase in VersaMark and used Gold Embossing Powder on Basic Black card stock. I think it really pops! I did die cut this with the Stitched Framelits. This is another product I use A LOT! The holly is Always Artichoke. To get a decent circle, I die cut a post it so it would stick a bit to the card stock and give me a template so I'd know where to stamp the holly. Since I was making several of these, I got better as I went along! I think this is another card easy to duplicate. My card base and layers are Crumb Cake and Basic Black. The trim you see is the Jute Twine in the Holiday Mini. This trim would be great to use to wrap your holiday packages.

Well that's it for now and I'll have new swaps next week to start sharing along with pictures from our Fall Fest. I'll be demonstrating our new Embossing Paste and the projects we made. Have a great weekend and thanks for stopping by! I look forward to your comments.

If you don't have a demonstrator, I'd love to be yours! Contact me know if you have any questions for need help with anything. All these products can be found in my STORE. When shopping, don't forget to use this month's VIP Host Code.


Wednesday, September 27, 2017

Last group of monthly swaps

I can't believe September is almost over! This month has really flown by! In just a few days we will be having our Fall Fest event and I may be getting more swaps! (From my monthly group and another organized Holiday Mini Swap).

So just to refresh if you haven't seen my other posts, I'm part of a group of usually ten women that swap every month. Each month the theme of the swap changes. Whoever is the host gets to determine the theme. For August the theme was a color combo. The colors were Crumb Cake, Dapper Denim, and Peekaboo Peach.


This first card was done a new member of our group, Laura. The sentiment on the card front was computer generated. She used some Designer Series paper from Pick a Pattern which uses the colors from the combo. Besides the combo, she also used Emerald Envy and Firty Flamingo. Laura die cut from the Swirly Scribbles in Peekaboo Peach and added some Burlap Ribbon and a Glitter Enamel Dot.

Carol did this next card and would be great sending to your friends and family that live at or near the beach! This is from Beachy Little Christmas. She used markers to color in the ornaments and used the banner from the Large Numbers Framelits. This is a great quick and simple card.

This last card I did. I saw something similar but using different colors. I'm not sure what papers they used but I stamped on Shimmery White. First I spritzed the card stock with water and then stamped the images so they would bleed and give a bit of a water color effect. If it wasn't bleeding enough I would spritz it a bit more. I used Oh So Eclectic. I really like this set. Unfortunately I haven't used it too much yet, but look out! The sentiment is from Label me Pretty. Both of these sets are bundles and new in the annual catalog. Oh So Eclectic coordinates with a framelit and the Label me Pretty has a coordinating punch. I used the combo color inks and card stock. (Crumb Cake, Dapper Denim, & Peekaboo Peach). I did add Whisper White as well. I stamped the sentiment and punched it with the 1 1/4" circle punch and then another circle in Peekaboo Peach with the 1 3/8" circle punch and then layered all that on the Pretty Label punch then popped it up on dimensionals. The Peekaboo Peach 5/8" Crinkle Seam Binding Ribbon goes great with this card as well. Before I added all my layers I did use the Dapper Denim marker and flicked it with the cap to give it a spray look.

I hope you enjoyed all these swaps. September swaps will hopefully be next week and the theme is fall/halloween. Thanks for stopping by and I look forward to seeing your comments. If you don't have a demonstrator, I'd love to be yours! If you need help or have any questions, please let me know. You can contact me HERE. When purchasing any of the products used you can find them in my STORE. Don't forget to use this month's VIP Host Code.


Related Posts Plugin for WordPress, Blogger...